As is the case with all of my articles, I feel obligated to start by saying that the following information is by no means a comprehensive method. That would be impossible. Not only because there are probably at least several thousands of books and articles written on the subject, but also because playing the blues is a lifelong pursuit. It can be argued that the blues is the basis of all contemporary popular music. Imagine covering all of that in a 2000-word article! This article is meant to be an introduction to soloing over blues changes. If you carefully read and internalize the information presented in this article, and then thoroughly practice the material, you should be able to play a convincing and interesting solo over the blues progression.
The blues progression is usually the first “jazz progression” that a young musician learns. A couple of months ago, I accompanied a student recital for an area teacher’s studio. The recital had a bunch of young musicians ranging from age 5 or so to high school seniors. A bunch of the very young pianists were playing the blues and they didn’t even know it. It’s a popular and easy progression, making it a common tool for teaching and learning. In its most basic form, it only consists of three chords (I, IV, and V).
I’m sure that I unknowingly played the blues progression as a young pianist as well. The first time I played it and was aware that I was playing it was probably in sixth grade as either a saxophone player or a guitarist. I remember jamming on the blues a lot on guitar with my older brother throughout middle school and part of high school.
The blues progression comes in all shapes and sizes. For the purposes of this article, I’ll use the blues progression in its simplest form to explain some methods for practicing soloing over blues changes.
Becoming Familiar with the Progression
The first step in learning about soloing over blues changes is to become familiar with all the elements that make up the blues progression. First, analyze the progression in terms of music theory: analyze the form, harmony, etc. For the basic twelve-bar blues progression that we’re using, the form is twelve bars and can be broken down into three phrases that are four bars each (I will use a double bar line to denote this in my examples). The harmony, again in its simplest form, consists solely of I, IV, and V chords. The blues progression is: I, IV, I, I, IV, IV, I, I, V, V, I, I.
Beyond becoming familiar with the progression in theory, you need to become familiar with the progression in practice. Think back to the first article I posted. I introduced a useful concept called “digital patterns”. Playing digital patterns over each chord helps to familiarize you with that chord. Likewise, playing digital patterns over a tune helps internalize that tune’s progression.

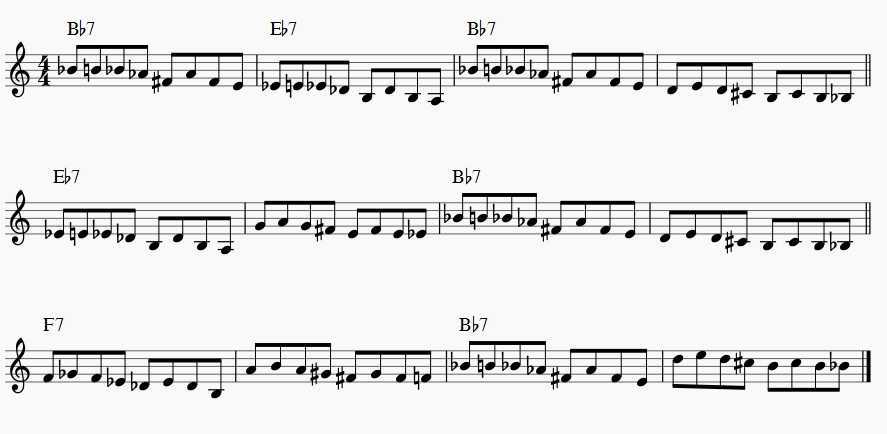
This first example is pretty straightforward. It simply demonstrates playing 1357 over each chord in the progression. Remember, the point of doing this is not to create an interesting solo. At least, not yet. The point of running digital patterns is to become familiar with the progression and to get the sound in your ear.
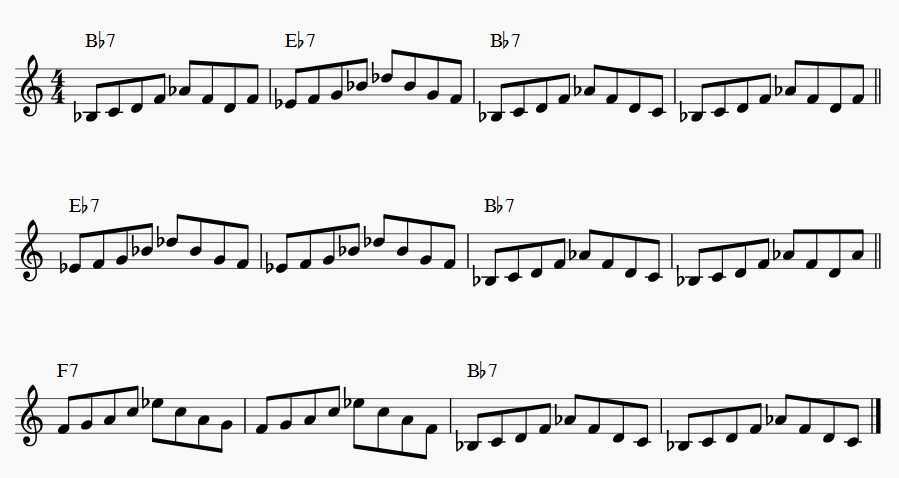
This second example shows the next logical step in this method. Not every measure utilizes the same digital pattern. What did I do to come up with this example? First of all, these examples are meant to be exercises. You would never play 1357 over each chord and have that be your solo. In this second example, I used all continuous eighth notes to create perpetual motion. It’s an exercise. You could create a solo using only eighth notes, but at some point you’d want to create rhythmic interest. To create the example above, I started off by using the digital pattern 12357532. Not every measure is a strict reading of that digital pattern. I altered some notes to make each measure flow better into the next measure, and make the pattern sound better melodically overall. Changing these few notes makes it sound slightly more like a solo than an exercise. It’s still an exercise, but it’s the next step in creating the melodic interest that can make a good jazz solo.
Other than analyzing the blues progression and applying digital pattern exercises to it, another thing you should do to become familiar with the progression is get the sound of the progression in your ear. Listen, listen, listen. Music is an aural art. You can listen to recordings of jazz artists soloing over blues changes or you can listen to jazz play-alongs of the blues progression. Another helpful tool is learning to play the blues progression on piano or guitar. Learning progressions on other instruments can help you to see/hear the progression in a different way.
Applying Scales, Patterns, etc.
Once you’re familiar with the basic sound of the blues progression, the next step to soloing over blues changes is to apply some of the material that you’ve practiced. Applying material that you’re familiar with to new material that you’re just learning is an extremely effective method. In my most recent articles, I discussed a few of the most useful jazz scales. Below, I wrote out some exercises applying these scales to the blues progression.
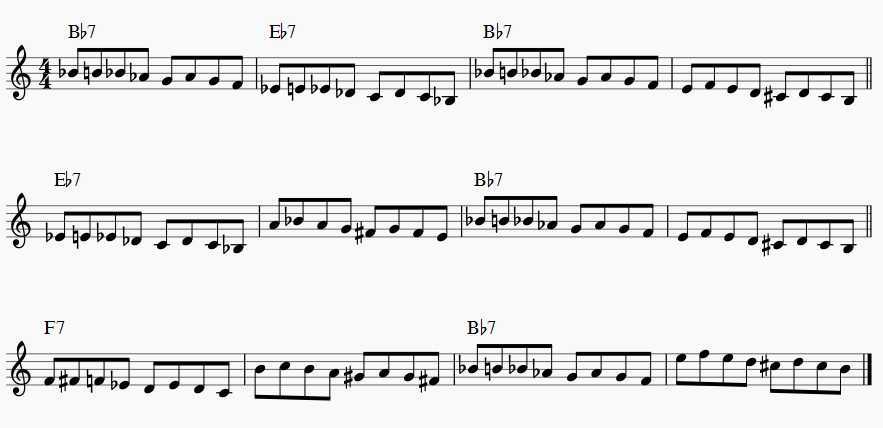
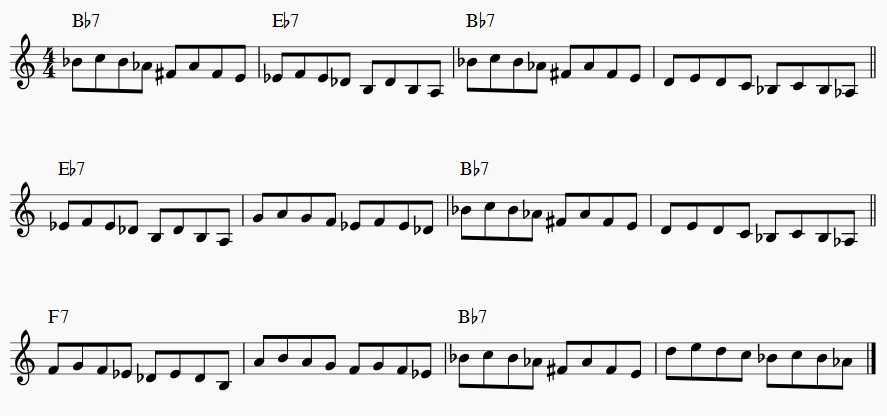
With these three examples, I used the same pattern shape using three different scales. Once again, these are exercises to get the sound of each scale over the blues progression in your ear. These exercises alone do not make for a cohesive and convincing solo. First, you should play each scale straight over each chord. Then, use the examples above or apply some of your favorite scale patterns.
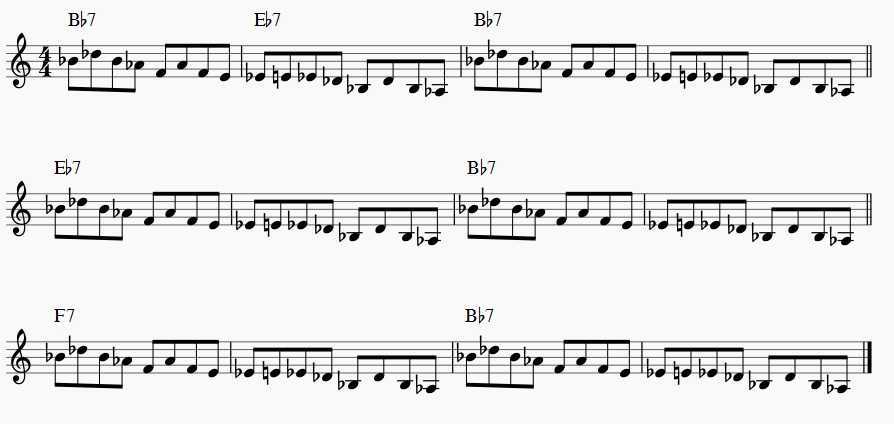
This example uses the blues scale. Remember when we talked about the blues scale, we figured out that one blues scale could be used over the entire blues progression. This example is simply the same two-measure line repeated six times. Try coming up with your own two-bar or four-bar blues line and playing it over the blues progression. Pro jazz musicians do this. Check out “Sonnymoon for Two” by Sonny Rollins. One of the most popular blues heads ever written, and it’s so simple.
Creating a Cohesive Solo
Okay, now we’ve done the preliminary work necessary for convincingly soloing over blues changes. The key is to organize the material that you’re familiar with in order to create an interesting solo. If you’ve never improvised before, or are not happy with past improvised solos, it’s okay to write out some solos. Writing out solos can be a very beneficial exercise.
A great exercise could be to write out two choruses of the blues. Then, put on a play-along, or have a friend or teacher play the blues progression on piano. Record yourself playing the two choruses you wrote out, immediately followed by two choruses of improvisation. Then, listen back. The more you do this, the more comfortable you’ll be soloing over blues changes.
The more you do anything, the better you’ll be at it.
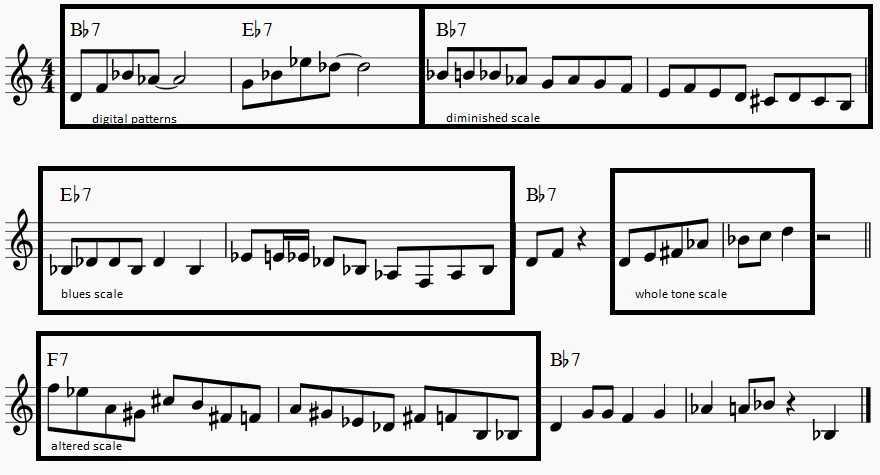
I’ve written out a sample chorus using a few of the methods discussed above:
Alternate Versions of the Blues
Above, we used the blues progression in its most basic form to learn about soloing over blues changes. Learning to improvise can be involved, so starting with the most basic template is an effective way to start. Over the years, though, the blues progression has been altered several times to make it more harmonically interesting. Here are a few examples of more complex blues progressions:
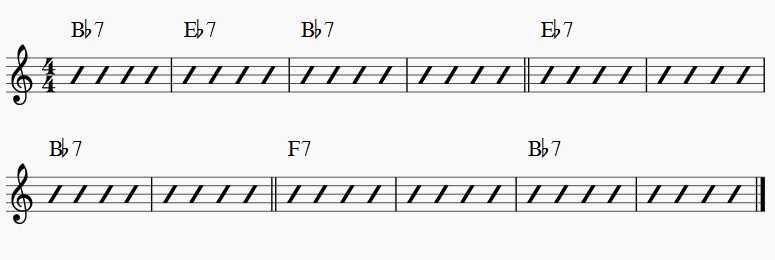
This is the progression used above, just for comparison’s sake.

This is the pop blues progression. You can hear it in most pop and rock songs that use the blues progression. It’s almost the same as the progression used above, except it uses a V-IV-I cadence instead of just the V-I cadence.

This example uses some common alterations. Instead of going IV-I, a couple of common passing chords are used, either a passing diminished chord (#ivdim7) or a VII7 chord. Also, measure 8 is commonly a VI chord to lead into the cadence. I also changed some of the Vs to ii-Vs to create more harmonic movement. Bars 11-12 utilize a common walk-down progression (I7, VII7, bVI7, V7). Another option for the last two bars is a simple iii-VI-ii-V.

This example is the “Bird Blues” progression. Look up the tune “Blues for Alice” by Charlie Parker. The Bird blues progression is a progression Charlie Parker wrote. It uses bebop harmony to create as much harmonic motion as possible. The first chord can also be a Imaj7.

I threw a couple of different advanced progressions in this example. The first four bars use “the cycle”. What “the cycle” refers to is the cycle of fourths. In one of my first articles, we talked about root movements for practicing. An example would be practicing your major scales around the cycle of fourths: C, F, Bb, Eb, etc. You can use the cycle when soloing over blues changes. You start on the bII chord and go around the cycle. This way, you hit the IV7 chord on the fifth bar. Harmonically, this doesn’t really fit, but the cycle of fourths progression will be strong enough that it will sound correct. A good rhythm section will hear what you’re doing and play the chords. Likewise, you should hear when a rhythm section hits that bII chord on beat one and know what they’re doing. If they don’t hear what you’re doing, it’s okay. It still sounds good. For the cadence in this example, I used “Coltrane changes”. This is another example of something that isn’t quite correct harmonically, but sounds good because of its strong internal harmonic motion.
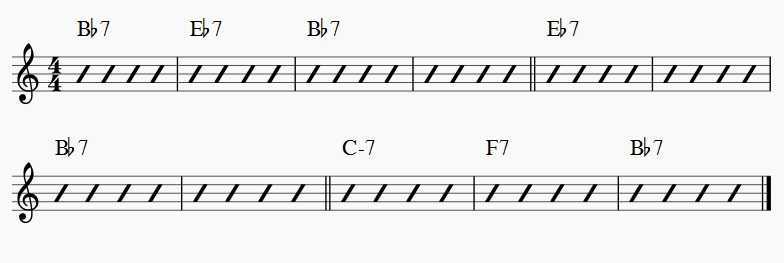
In addition to altering the harmony to change the blues progression, you can also alter other things. You can alter the time signature: playing the blues in 12/8, 3/4, etc. is not uncommon. You can also alter the length of the progression. There are many compositions written that use the 24-bar blues progression. Each bar of the 12-bar blues progression is just turned into two bars, to make the progression longer. If you want to be hip, you can also try playing a 10-bar, 11-bar, or 13-bar blues. The example above shows a sample 11-bar blues progression.
With all the progressions in this section, you should apply all the methods discussed earlier in the article to get fully acquainted with each progression.
Conclusion
When I was in grad school, the trumpet player Tim Hagans came and did a week-long residency. He worked with the students in a variety of settings. One of those settings was him working with a small jazz combo that I was in. He had us do an exercise in which we played the blues, but with no harmony. The instructions were as simple as that: “Play a 12-bar blues, but don’t play it in any key… ok, go.” So we tried it out. It wasn’t perfect. But what was interesting about it was discovering that the blues still sounds like the blues even when the harmony is removed. The blues progression is so strong that all you need is the rhythm.
 Speaking of the blues not needing harmony, you should practice all of the above in twelve keys. The blues progression is arguably the most important progression in jazz and probably one of the most important progressions in all of music. If you listen for it, you’ll hear it present itself in a lot of popular music.
During the Bebop Era in the 1940s, learning songs in twelve keys became an essential part of being a jazz musician. The most important songs to learn in twelve keys were the blues, rhythm changes, and “Cherokee”. This remains pretty much unchanged today. If you learn those three progressions in twelve keys, your musicianship will become pretty great pretty quickly. Also, working with singers and guitarists, you’ll need to know the blues in every key. In jazz, the most common keys for the blues are Bb, F, and Eb; in pop and rock, the most common keys for the blues are E, A, and D. Soloing over blues changes in twelve keys is essential to being a complete musician.
In my next article, I’ll go over some methods for practicing using another popular progression: rhythm changes.


