Though his career was relatively short, George Gershwin is remembered as one of the most prolific composers of the 20th century. Many of his compositions (“Rhapsody in Blue”, “Summertime”, “Fascinating Rhythm”, etc.) have become household names. But out of all of Gershwin’s compositions, none are quite as well known as “I Got Rhythm”. Since it was first released in 1930, “I Got Rhythm” has influenced thousands of recordings and compositions. “I Got Rhythm” is the second most popular template for contrafacts, the blues being the most popular. A contrafact is a jazz term for a new song composed using existing chord changes. The chord changes to “I Got Rhythm” have been used so many times that they are now referred to simply as rhythm changes. Since it’s such a popular progression, soloing over rhythm changes is an important skill for any jazz musician.
I remember my first introduction to rhythm changes. I was attending a jazz summer camp in between my sophomore and junior year in high school. Someone put a rhythm changes lead sheet in front of me for the first time, and I remember feeling nervous and intimidated. To someone that’s never seen rhythm changes before, it’s easy to feel overwhelmed. In the ‘A’ sections of the rhythm changes progression, the harmony changes pretty much every two beats. Add to that the fact that rhythm changes is often played at a fast tempo. Attempting soloing over rhythm changes for the first time may seem way more complicated that it has to be. In this article, I hope to break down the rhythm changes progression, analyze it in terms of things we’re already familiar with, and offer a systematic approach in order to make playing over it seem like a much less daunting task.
Becoming Familiar with the Progression
The process of becoming familiar with the rhythm changes progression, applying previously practiced material, and learning to play a cohesive solo is a similar process to what we did last time with the blues progression. There are a couple of additional things we can do when working on rhythm changes, though. Soloing over rhythm changes and soloing over the blues are similar in some ways and different in some ways. I’ll attempt to illustrate these similarities and differences throughout the process. It’s good to go through this process with several tunes.
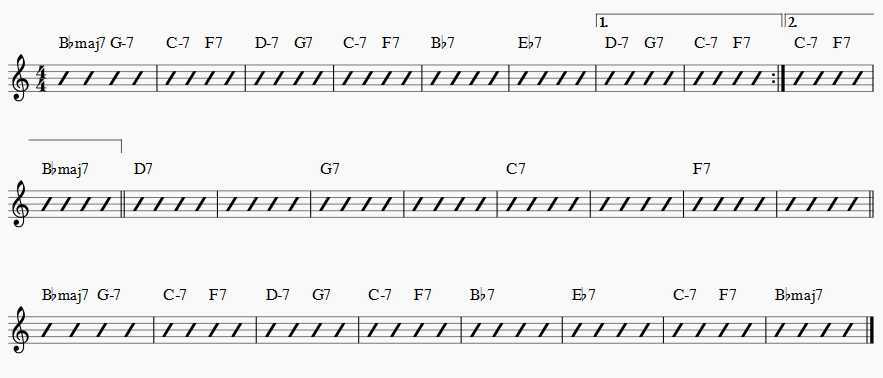
The musical form of rhythm changes is AABA, with each section being eight bars. As with the blues progression, there are quite a few different harmonic versions of rhythm changes. For the purpose of this article, I’ll use one of the simplest versions. I’ll go over alternate versions later in the article. The most basic version of the ‘A’ sections of rhythm changes is: I vi / ii V / iii IV / ii V / I7 / IV7 / I VI / ii V. Immediately we can see some similarities to the blues. The most obvious similarity should be the IV-I resolution. The ‘B’ section is: III7 / VI7 / II7 / V7, with each chord lasting two bars. If we want to analyze the ‘B’ section perfectly in terms of music theory, it’s actually: V7/V7/V7/V7 followed by V7/V7/V7 followed by V7/V7 followed by V7.
As I went over last time, getting any progression in your ear is a necessary step to being able to improvise over that progression. A few ways to get the progression in your ear are listening to recordings of jazz musicians soloing over rhythm changes, listening to and playing along with play-alongs (or a friend or teacher), and learning to play the progression on piano or guitar. For rhythm changes specifically, it can be easy to get lost with all of the ‘A’ sections. The good thing is, the ‘B’ section is very different, so if you do get lost, the first chord of the ‘B’ section should get you immediately back on track. But, to avoid getting lost in the first place, check out the subtle differences in the ‘A’ sections. The first ‘A’ section ends with a iii-VI-ii-V to lead back to the I chord. The second ‘A’ section ends on the I chord before going to the striking III chord that starts the bridge. The final ‘A’ section also ends on the I chord as a final cadence. If you can train your ear to hear these subtle differences, you shouldn’t have any trouble knowing where you are in the form at all times.
As we’ve gone over a few times before, another effective way to familiarize yourself with new changes is to apply digital patterns.
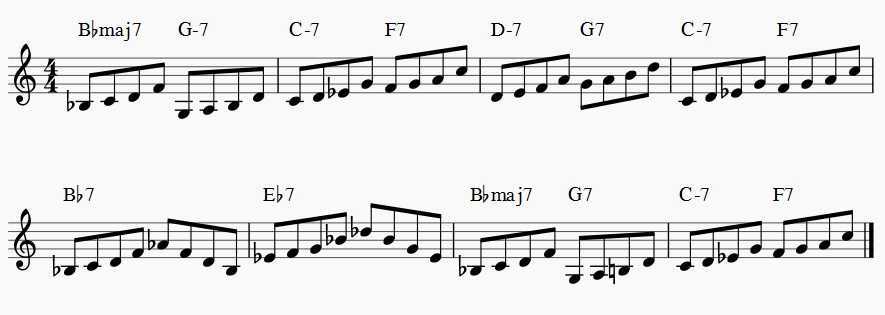
This first example uses 1235 over each chord of the ‘A’ section. On the chords that last a whole measure, I used 12357531. It’s okay to start slow when practicing this. Set your metronome at a tempo in which you’re comfortable that you can play the pattern accurately. Accuracy is important. Accuracy always comes before speed.
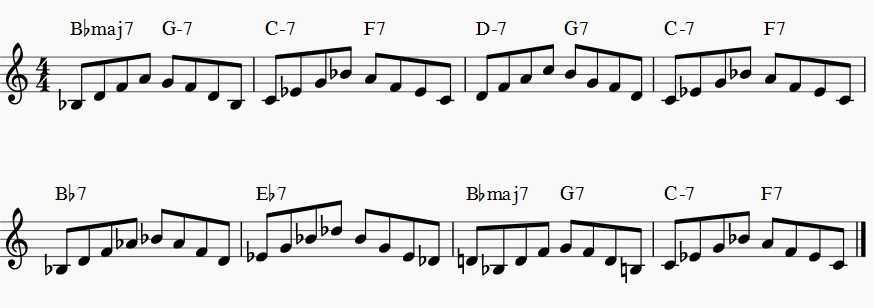
This next example displays the next step in the process. Once you’re comfortable playing a variety of different digital patterns over the progression, you can vary those digital patterns into all of their permutations. This specific example uses 1357, but the pattern is not always in that order. What I did to create this pattern was have in mind that I wanted each measure to have an ascending and descending arch, and then go to the closest note (in the 1357 pattern) that would achieve this. This is a good exercise in basic improvisation. This is what’s called a “chord tone solo”. The idea is to create a solo using only chord tones (1357). My example is very basic. When practicing chord tone solos, you can use the notes in any order and should use more rhythmic variation in order to create rhythmic interest.
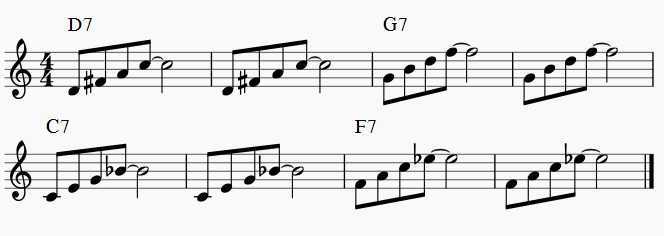
This example is a basic 1357 digital pattern used over the bridge.
When you’re playing chord tone solos, you will eventually discover what resolutions sound good. Resolutions that sound good get from one chord to the next using a half-step or a whole-step. An example would be V7-I. The strongest resolutions are 3-1 and b7-3. In jazz, when we talk about common resolutions, we usually talk about the resolutions for ii-V. I wrote about common resolutions a little bit in one of my first blog posts.

This example shows common resolutions for the ‘A’ section of rhythm changes. The top notes are the 7-3 resolutions and the middle notes are the 3-7 resolutions (for the ii-Vs, the note doesn’t change when the harmony does). The bottom notes are the roots of each chord, just for reference. As an exercise, try to write out the 7-3 and 3-7 resolutions for the ‘B’ section. Both resolutions should change by a half-step every two bars.
Applying Scales, Patterns, etc.
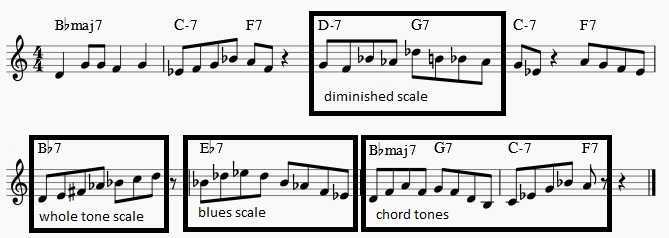
Once you’re familiar with the sound of rhythm changes, the next step in learning soloing over rhythm changes is to apply previously practiced material. I’ve written out examples using a few of the scales we’ve worked on: the diminished scale, the whole tone scale, and the altered scale. For the ‘A’ sections, I used the scale based on the V chord for each measure with a ii-V. For the first bar, I just wrote out the major scale. These three scales are meant to be used over dominant chords. It’s possible to use the diminished, whole tone, or altered scale based on the V over the first measure, but for the purpose of this exercise, I just wrote out the major scale. I think it provides a ‘ground’ for when you’re first practicing this material. The ‘B’ section only consists of dominant seventh chords, so it should be pretty self-explanatory.


The Bb blues scale can be applied to the entire ‘A’ section. It doesn’t really work over the bridge.

Creating a Cohesive Solo
After you’ve completed all the preliminary work above, you’re ready to combine all of the material and try to create a cohesive and interesting rhythm changes solo. You can repeat the same exercise as last time: write out a chorus of rhythm changes, put on a play-along, and play that chorus followed by a few improvised choruses. Remember to use rhythmic variety. Also, always remember to record and listen back to your solos.
Here’s a sample ‘A’ section using the methods described above:
Alternate Versions of Rhythm Changes
All of the examples above use a fairly generic version of the rhythm changes progression. Once again, using a basic template and applying familiar material to it is the most effective way to practice something new. Many compositions based on rhythm changes have been written over the past 85 years or so. There have been a lot of alternate changes written. I’ve written out a few examples of other rhythm changes progressions. I’ll go over some alternate changes for the ‘A’ section, followed by the ‘B’ section:
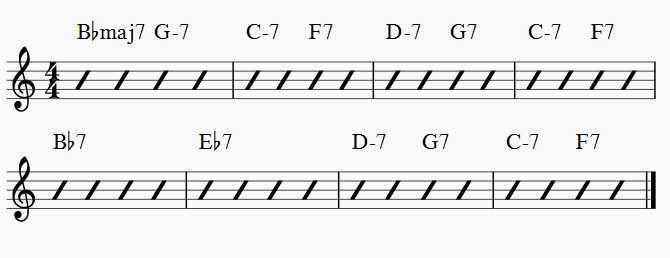
This is the progression used above, for comparison’s sake.
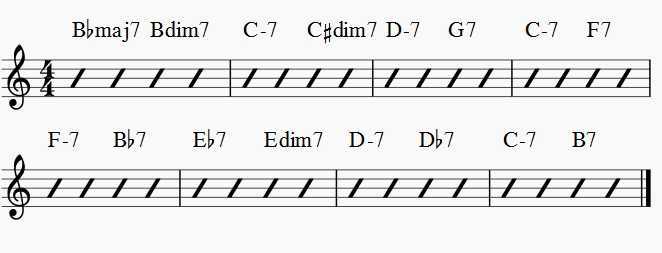
This example shows where you can place a passing diminished chord. The first two bars are a very common substitution. The sixth bar uses the same passing diminished chord that we went over in the blues to get from IV to I. I changed the fifth bar to a ii-V. Virtually any time there is a dominant chord, you can change it to a ii-V to create more harmonic motion. I altered the seventh and eighth bars using tritone substitutions. Check out the bass line in the seventh and eighth bar going back into bar one.
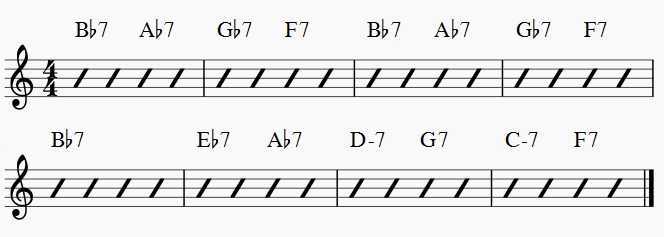
This example uses a walk-down progression. I used it as a substitution at the end of the blues progression. This can be used as a substitution for a I-VI-ii-V. There’s a rhythm changes tune called “C.T.A.” that uses this progression as I did in the first four bars. In the sixth bar, I wrote in another passing chord to get from IV to I.
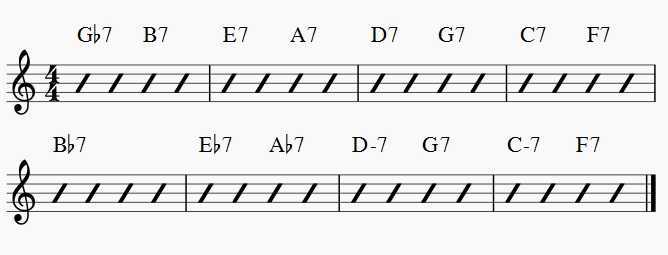
This example uses another substitution we went over last time. You can use the cycle of fourths as a substitution. The target measure is the fifth bar. In the blues progression, we start on bII to get to the IV chord right on the fifth bar; in rhythm changes, we start on bVI to get to the I chord right on the fifth bar.
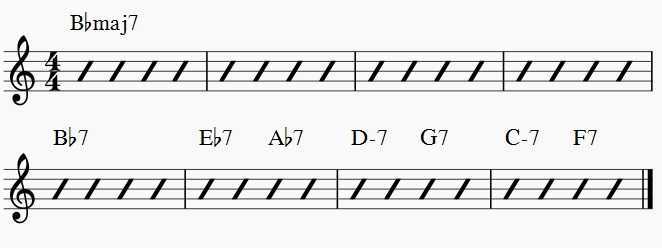
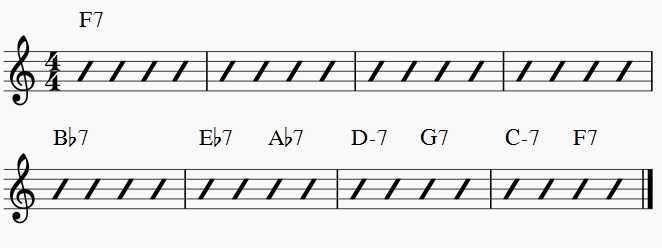
These next two examples use the same idea in two different ways. The examples above make the progression more difficult. These examples make it simpler, in a way. In the introduction to this article, I mentioned how I remember being intimidated the first time I saw rhythm changes. That was until someone told me a secret. Over the first four bars, you can play the Bb major scale and it sounds good. You can actually do the same over the last two bars as well. As long as you hit the chords in bars five and six, you can use the Bb major scale over the rest of the progression when soloing over rhythm changes.
Likewise, you can turn the first four bars into a dominant V chord. This makes the resolution on the fifth bar stronger. Many times, you’ll hear a rhythm section play a pedal tone on the fifth over the first four bars. By making the first four bars a V7, you have the freedom to use any altered scale and create some pretty strong tension.


For the examples of the bridge, I wrote out some common substitutions that a soloist or rhythm section may use over the normal rhythm changes bridge. The first example is the normal bridge, the second example turns the V chords into ii-V progressions, the third example uses tritone substitutions to create a walk-down bass line, and the fourth example turns the tritone sub Vs into ii-Vs. These examples are substitutions over the normal rhythm changes bridge. Some tunes, such as “Eternal Triangle” have a totally different bridge. Keep that in mind if you’re soloing over rhythm changes on a specific tune.
Conclusion
I remember my junior year of college, taking a couple of the required courses on improvisation. The second required improvisation course at Indiana University was a course specifically dedicated to the blues and rhythm changes. One of the assignments for the course was to learn two blues heads and two rhythm changes heads in twelve keys. I chose to learn two bebop rhythm changes heads, “Anthropology” and “Moose the Mooch”, in twelve keys. It wasn’t such an easy task, but it was well worth it. Try learning any bebop head in twelve keys and you will find yourself with a lot of new practice material. There’s so much in every bebop head. Some good bebop rhythm changes heads are: “Anthropology”, “Dexterity”, “Eternal Triangle”, “Moose the Mooch”, “Shaw ‘Nuff”, and “Wee (Allen’s Alley)”. Before you do that, though, try to get a basic understanding of soloing over rhythm changes. It will make learning rhythm changes heads in twelve keys much easier.
The methods described above are in no way a complete or comprehensive guide for soloing over rhythm changes. As with the blues, soloing over rhythm changes is a lifelong pursuit. This article is meant as an introduction. If you thoroughly practice the material above, though, you should have a pretty good understanding of rhythm changes.
Next time, I’ll continue applying some of the methods used above as well as some new methods to a standard jazz tune: “Autumn Leaves”.


