 Many people of all different ages and backgrounds have tried their hand at learning how to play the guitar at one point in their lives, but sadly, being able to play the guitar is a skill that most people don’t possess and it’s easy to see why. Without instruction, getting your footing on this incredible instrument can be really difficult. That’s why we’ve created this special Musika Lessons guitar tutorial geared toward complete beginners. If you want to play the guitar but have no clue where or how to begin then you’ve come to the right place. In this guitar tutorial, we’ll give you everything you need to know to get started on this remarkable instrument. In addition to introducing you to scales and chords, we’ll show you how to form good playing habits early on in your playing.
Here’s what you’ll need to be able to get the most out of this guitar tutorial:
-An electric, acoustic or classical guitar
-A metronome: This is a device that produces audible rhythms for you to practice to. You can download lots of free or inexpensive metronome apps straight to your smartphone, or your local music store should carry a few options.
-A tuner: Your guitar will have to be tuned in a certain way to be able to produce scales, chords and riffs correctly. Tuners are devices that are able to detect the pitches your strings produce to help keep you in tune. Like metronomes, there’s plenty of cheap and free app options as well as ones you can pick up in your local music store.
-A guitar pick: There’s some amazing guitar music out there written in the fingerpicking style, but to make things easy for the purposes of this beginners guitar tutorial, we’ll get you started by playing with a hard pick. You can pick up soft, medium or hard picks at your local music store.
Challenges to learning the guitar
 The guitar is an instrument that gives students a unique set of challenges that other instruments don’t really have. The biggest hoop students have to jump through is the uncomfortable process of building up callouses on their fingertips. Calluses are leathery buildups of extra skin that the body produces to protect itself. The first few weeks of playing guitar is uncomfortable and even a little painful for new students who haven’t been playing long enough to develop these protective calluses, but as soon as they’re developed, playing the guitar is relatively painless.
Applying basic music theory concepts like scales, chords and other ideas is another significant challenge of learning the guitar. The guitar is an instrument that basically condenses a huge amount of range into six columns (strings). This means that the guitar isn’t a linear instrument like the piano is, which makes understanding basic music theory ideas more of a challenge.
But even with these challenges, the guitar is much more approachable for beginners compared to other instruments. It’s a tool that musicians have used to create incredible music in virtually every genre over past few hundred years, and music being made with guitars continues to grow, expand and evolve with technology and innovation. Learning just a few guitar basics can help set you on a path towards mastering all the necessary skills needed to become proficient on the instrument.
Components of the guitar and how to hold it correctly
Before we give you some helpful exercises to help you get your footing on this incredible instrument, it’s a good idea to get familiar with all the different components of the guitar. Here’s a simple visual guide to help you get started:
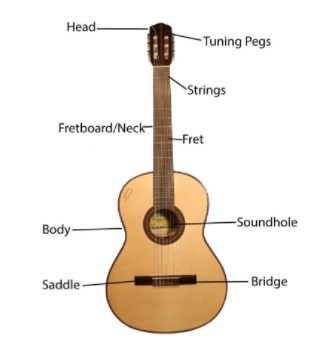
The instrument featured in this visual guide is a classical guitar, but what you’ll learn here in this guitar tutorial will be the same and applies whether you play an acoustic, classical or electric guitar. Guitars are instruments that feature strings suspended over a long narrow piece of wood (the neck) that are connected to solid or hollow body. Acoustic and classical guitars feature hollow wooden bodies, and electric guitars feature solid ones.
If you’ve got an electric guitar, you’ll eventually need an amplifier, but it’s not necessary for this guitar tutorial or to master basic playing concepts. Acoustic and electric guitars don’t need amplifiers because they rely on a natural system of amplification (that’s what a guitar’s soundhole is for).
Starting out by learning how to hold your instrument correctly is essential for developing a proper playing technique no matter what kind of guitar you have. We recommend sitting down to develop your playing technique at first to make learning basic guitar concepts easier before you try standing and playing.
The correct way to hold a guitar is to have your back straight and the body of the instrument placed squarely at your torso. Some beginner students hold the guitar in a way that has their fingering hand positioned at their torso so they can look straight down at the neck of the guitar, but this position is bad because it doesn’t their picking and strumming hand enough flexibility to be able to comfortably play.
From here on out, we’re going to refer to the left hand as the fingering hand and the right one as the strumming hand. Feel free to switch these if you’re playing left-handed.
Exercise #1: Fret Finder
 This exercise is designed to get your left hand fingers acquainted with the neck of the guitar. On the guitar, different notes, scales and chords are produced when different combinations of frets are pressed down by your fingertips. Start by placing your left hand’s index finger down on the first fret of the thickest string. We’ll call this string the sixth string. Then, lift up that finger and place your middle down on the second fret. Remember, we’re doing absolutely nothing with our right hand yet, and we’re not trying to press down hard enough to produce tones on the strings yet. All we’re trying to do here so far is to show you how your left hand should look when it’s in the correct playing position.
Repeat this same sequence on the third and fourth frets with your ring and pinky fingers. Then, do the same exact thing on the fifth, fourth, third, second and first strings. Feel free to repeat this exercise on various positions up the neck of the guitar.
Exercise #2: The Up and Down Warmup (Chromatic Scale)
In this exercise, we’ll introduce the concept of pressing down your fingers in a way that produces pitches. Before we go into the up and down warmup, let’s talk about how to press your fingers correctly down on the frets. You’ll need to press strings down on frets firmly with your fingertips to produce notes. Pressing down with enough pressure will result in a clear tone, but not applying enough pressure will generate a buzzing sound. It takes some students a long time to develop this skill on the guitar, but exercises like the ones we’re about to show you will help get you on the right track. If you’re completely new to playing guitar, expect to feel some minor discomfort when you try pressing down the strings for the first time.
This exercise is basically the same as the first one we showed you but with the strings pressed down. You’ll start the up and down warmup by playing the open 6th string. Then, press your index finger down on the first fret and play the string again. Lift your index and the press down the second fret with your middle finger. Repeat this same sequence with your ring and pinky fingers on the third and fourth frets. You’ll repeat everything you did on the sixth string on until you reach the fourth fret of the first string. Then, do everything you just did backwards until you reach the open sixth string again. This warmup is also called the chromatic scale because it explores the lower range of the guitar step by step.
From here on out, it’s important that you add the alternate picking technique to everything you play on the guitar that features single notes. This includes scales, riffs and melodies. New guitarists often only pick in one direction, but this is poor technique that will have to be fixed down the road. With the alternate picking technique, your right hand will never pick the same direction twice. Alternate picking naturally harnesses the momentum your hand generates during picking. Add this picking pattern now right from the very beginning of your playing so you don’t have to do it later when your playing is more developed after habits have formed. After trying it a few times, try practicing this warmup to the slow click of a metronome.

This will probably be the most important exercise you’ll play on the guitar because it teaches you the first position of the guitar, introduces proper picking technique and shows you how to properly press your fingers down on the frets. We recommend practicing this warmup 2-3 times every time you practice for the first few months of your playing.
Exercise #3: The Open String Warmup
This exercise is designed to help teach you how to transition from string to string. It’s also a great way to get to know the names of the open strings.
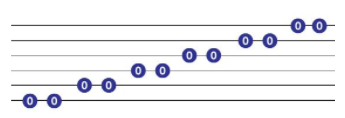
Here’s a list of the open strings and the pitches they’re tuned to in standard tuning:
6-E 5-A 4-D 3-G 2-B 1-E
Start by picking the open sixth string up and then down. Repeat this sequence on every string until you get to the open first string. Then repeat everything you just did backwards until you get back to the open sixth string again. When you’re ready, practice this exercise to your metronome set on a slow setting. Try your best to maintain a rhythm by not pausing during this exercise. Feel free to add in more challenging picking rhythms if this exercise is too easy for you.
Exercise #4: The E Major Pentatonic Scale
This simple scale is found in countless guitar riffs and vocal melodies in music. Pentatonic scales are built off of five notes. This and every other guitar scale can be moved to any fret on the guitar, and many chords and riffs work the same way. This means that many of the complex things you learn on this instrument only have to be mastered just one time before they can be adapted and applied to different keys. This is one of the many reasons that the guitar is so approachable once you get your bearings.
Start by playing the open sixth string and play the notes on the second and fourth frets. Then play the second and fourth frets on the fifth string. Do the same thing on the fourth string and then play the first fret of the third string. Play the open second string and then the note on the second fret. Lastly, play the open first string and then the notes on the second and fourth frets. Remember to use the alternate picking technique for this scale. Add in the metronome when you’re ready. Once you’ve mastered the major pentatonic scale in this position, try playing it on a few different spots up the neck. Just remember that the open strings you play in this position won’t apply to other minor pentatonic scales up the neck.

Exercise #5: Simple Chord Transitions
Different combinations of individual notes form the various chords we hear in music. As a guitarist, you’ll need to develop a broad chord vocabulary as well as the skill of transitioning from one chord to another. We’ll start you out by showing you how to play a few simple chords.
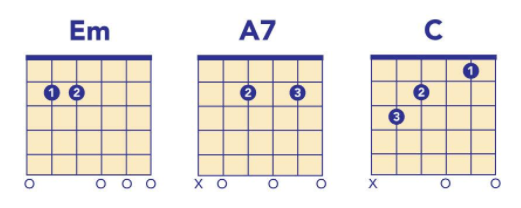
For these three chords, your middle finger will press down the second fret of the fourth string. Think if this finger as an anchor. Start by getting each chord to sound as clear as you can get it. Play the chord’s individual notes to make sure you’re pressing your fingers down hard enough if your chords don’t sound clear.
When you’re ready, try strumming each chord down and then up to the slow click of your metronome. You’re goal here should be to seamlessly transition from one chord to another without pausing. The skills you develop here apply to all chord transitions, not just the ones for these specific chords. Feel free to leave out a finger from any of these chords if they’re too challenging at first and to add more advanced strumming patterns when you’re ready.
Exercise #6: The Power Chord Warmup
Our last exercise is an introduction to the world of power chords. Power chords are condensed versions of the normal chords we hear in music. They lack the defining note that makes a chord major, minor or diminished. These chords are easy to play and can be moved to any spot on the guitar. The biggest challenge to playing power chords is to not strum the extra open strings. Over time, you’ll learn to mute unwanted strings with your left hand. Experienced guitarists often intentionally strum muted strings to get a percussive sound out of the guitar while playing power chords. Nirvana’s “Smells Like Teen Spirit” is a great example of power chord muting.
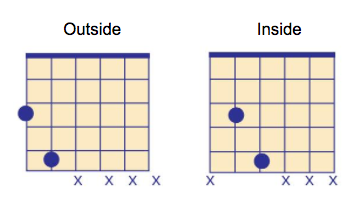
For this exercise, start by playing the outside power chord on the 12th fret. Then, play the inside power chord on the same fret. Repeat this sequence until you reach the bottom of the guitar. Start with a simple up and down strumming pattern and try incorporating muting when you’re ready.
Endless possibilities
We hope this guitar tutorial helps you get your footing on this incredible instrument. The fundamentals we’ve introduced you here will help give you what you need to get started playing rock, blues, jazz and virtually every other style of guitar music you can think of. If you’re serious about developing your prowess on this amazing instrument, we recommend finding an experienced teacher in your area to work with. For more helpful articles about the world of music, check out what we have posted on the Musika Lessons blog.


