There are two instances when you need to mix audio: when an album is being recorded and when a band is performing live. In either situation the intention is the same; ensure that every piece of the performance can be heard. Some audio mixing basics make it possible to achieve this balance and the fundamentals are often enough to achieve an adequate sound.

When beginning the art of audio mixing, it’s often helpful to think of the process visually; in a band every instrument has its place, and they all must be seen. If the drums are right in front, the bass may be obscured. You have to create a space for every component, and determining how much space each instrument gets is an art in itself.
Individual Track Mixing
The first step of audio mixing basics is to ensure that each, individual track is an accurate representation of the instrument and that it sounds good. This is significantly more detailed and important when you are mixing a studio recording rather than a live performance. This process can be very involved, and is different depending on the recorded instrument.
Each instrument has a unique sound which is referred to as its timbre (pronounced TAM-ber). Because different instruments vibrate in different frequency spectrums, and have different resonant frequencies, the same note sounds different when played on two different instruments- this is timbre. The timbre of an instrument will influence how you mix that instrument, because you want to preserve that quality, otherwise your guitar could end up sounding like a piano.
Equalization, or EQ, is the most important part of track mixing. This is how you will preserve the unique tone of each instrument. It is also how you will create space for the sound of other instruments and prevent them from obscuring each other. EQ allows you to amplify or diminish individual frequencies along the spectrum. While there are particular frequencies which are commonly and universally adjusted for specific instruments, the best practice is to use your ear to find the tones which sound best, and amplify them, and the tones which sound bad, and reduce them. This is done by setting the EQ to boost a narrow frequency range, and then slowly moving it along the entire frequency spectrum while you listen for the best and worst tones. This is a practice that takes some time to develop.
Some audio mixing basics for EQing instruments are: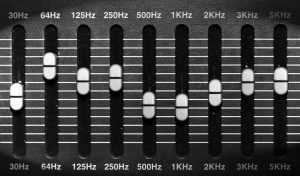
- Remove the mid-range of drums
- What you amplify in the kick drum, remove from the bass guitar, and vice versa
- Overly boosting high frequencies (2,000 Hz – 20,000 Hz) can result in ear fatigue
- Too much low-end (20 Hz – 500 Hz) can damage speakers
- Snare drums have a resonant ping at 2 kHz that is often amplified
- Mid-range frequencies (500 Hz – 1000 Hz) can have a boxy sound
Compression is another integral part of audio mixing basics. It helps to preserve the track’s timbre by amplifying the subtleties and nuances of an instrument’s sound relative to the main frequencies. It also helps to level out the volume in a performance which is very dynamic, or varying, in sound level. For example, if you have a vocal performance that ranges from periods of talking or whispering to moments of singing at a loud volume, then the track will be inconsistent in volume. Compression can be used to tone down the loud moments relative to the quieter ones so that every part of the performance can be heard.

Using compression involves a bit of a learning curve, and it is one of the more difficult parts of audio mixing basics to get a handle on. Basic compression involves setting a threshold which reduces the amplitude, or volume level, of anything that goes over the threshold. Typically digital compressors offer a visualizer which allows you to see when a performance goes over the threshold. Listening to the track while watching the visualizer will allow you to find the moments when a track is too loud, and adjust the threshold to the appropriate point.
General rules for compression include:
- Use on vocals to bring out subtleties of voice
- Use on snare drums to accentuate the crack
- Do not use on cymbals or any instrument with a long, fading resonance
Reverb is used to make a track sound natural, as if it is taking place in a larger space rather than a small recording room. It is a random and compounded echoing sound—you might notice its natural occurrence when speaking in a large empty room. When a track does not have reverb added to it, it is referred to as dry, and often a dry track will sound unnatural and empty.
The easiest way to work with reverb, as a beginner, is to use the presets available on a digital reverb program. These presets are typically characterized by the type or size of room they resemble: small room, cathedral, large hall, etc.
Some quick tips for using reverb effectively are:
- Be sure to place the reverb effect after compression
- Heavy reverb can be added to guitars for a spacey, ambient effect
- Do not use reverb on bass-heavy instruments like a kick drum
- Light reverb is necessary on vocals for them to sound natural
Multi-track Mixing
Once each of the individual tracks is sounding their best, it’s time to mix them all together. The purpose of this is to ensure that each track can be heard clearly, relative to each other. This process  is all about using your ears to make sure that everything can be heard, and it can be quite difficult until you’ve trained your ears to listen carefully. There are, however, many tricks and tips which are effective at making this process easier. While the general process involves carefully listening and adjusting the levels of each track, let’s look at some common practices which make this process easier and more effective.
Panning is the process of balancing a track to either a left or right speaker. You may have noticed, when listening to a recording in headphones, that each headphone has different levels of each instrument. This spatial positioning of tracks creates room in each speaker for each track so that similar instruments do not dominate each other. It also creates the perception that a band is actually in front of you, with certain instruments to your right and others to your left. While the practice can be used for a number of interesting effects, like creating the impression that a sound is passing in front of you, it is most commonly set in the same manner that a band would appear. Certain drum cymbals may be panned to the right and far-right, while others may be panned to the left and far-left. On every track there is a panning knob which allows you to control this.
General panning practices include:
- Spacing out cymbals over the audio field
- Putting a guitar on either side
- Panning back-up vocals and harmonies to the sides while leads remain centered
- Never pan bass-heavy instruments
Stems are used to make the process of adjusting levels more convenient and fast, especially when you are working on the fly like with live sound. Stems are multiple tracks that are combined onto one track so that they may all be adjusted together, while maintaining their levels relative to each other. For example, once you are happy with the sound of all of the drums’ tracks together, you can combine them onto a stem and adjust the drums as a whole. Likewise you can group together every vocal track, guitar track, or only some of each.
 It’s a common, and very helpful, practice to use many different speakers of different qualities and sizes throughout the mixing process. Every set of speakers will impart their own mark on a recording, and listening to the mix through many different speakers will help ensure that the mix sounds good through any sound system. This is a very important, and often overlooked, part of audio mixing basics. If you mix an entire song, listening only through one pair of headphones, you may find that the panning isn’t heavy enough when you play it in a car sound system. The intent is to make the recording sound as good as possible, on as many different stereos as possible. You will usually have to comprise, finding the middle ground rather than making it sound perfect on one particular sound system. It is often useful to use a very cheap set of speakers at a very low volume to find parts of the mix which stand out as too loud or quiet.
And the most important part of mixing audio is to be sure to give your ears a break sometimes. Listening to the same track, over and over again, can leave your ears fatigued and ineffective. After a few hours of mixing, take a break for a few hours or a day, and return to the process when your ears are rested. Otherwise you may find yourself undoing your own hard work and making the process more difficult than it needs to be.


I'm always looking for good places to introduce beginners to the begin the journey into the art of audio! Nice well written guide, though remember rules don't truly exist in our art, more like " guidelines" ;) Also very good to see the correct usage of the word "stems" used as it is intended, and 90% of newbie engineers use it to describe the individual multi-track these days!